Making the Move from AngularJS to Angular - Part One: Understanding the Basics
Recently, many developers and corporations have decided to make the move from AngularJS (1.x) to Angular (2.x+). At first, there was a steep learning curve with new technologies and new Angular syntax, but overtime everything has become more natural and almost second nature. To alleviate some of the same trials and tribulations we encountered, we thought we'd share some of the common areas most developers will encounter in this blog series.
- Part One: Understanding the Basics
- Part Two: Controllers to Components and HTML Syntax
- Part Three: Services, Observables, and Routing
- Part Four: Commonly used controls and other items worth sharing (Coming Soon)
- Part Five: Enterprise Case Study (Coming Soon)
The New Setup Process
The setup within a solution between AngularJS and Angular is quite different. Grabbing Angular from NuGet is no longer an option. Angular has moved to being module based and is best written in TypeScript, a JavaScript superset that still compiles down to JavaScript.
Third Party Setup: Working with Angular requires developers to have some general understanding of some other technologies such as NPM and the Angular CLI (which uses Webpack under the hood), and intermediate to advanced knowledge of others like TypeScript and RxJS. For most developers, including myself, who haven't had extensive experience with these technologies before starting to use Angular, the initial move to Angular can seem a little daunting. By taking a little extra time to read over some of the documentation, one will be able to embrace how much better Angular is than its predecessor AngularJS.
A fair amount of this setup documentation can be found on the Angular website, but I'm going to implement it with the Angular CLI website as it makes setting up a project really easy and fast.
To begin, let's install the following:
- Node Version 4.6 or later (Additional NPM Documentation)
- .Net Core 2.0
- Angular CLI via Command Line (Additional Documentation)
- TypeScript (Additional TypeScript Documentation)
Setup in Visual Studio
The Visual Studio setup can be done inside an existing project or with a new one. For the sake of this blog, I'm going to setup Angular inside a new project. Once I get the project setup, I'll cover each of the files that are important to get the application setup.
-
Create a .Net Core 2.0 MVC Project (See Figure 1)
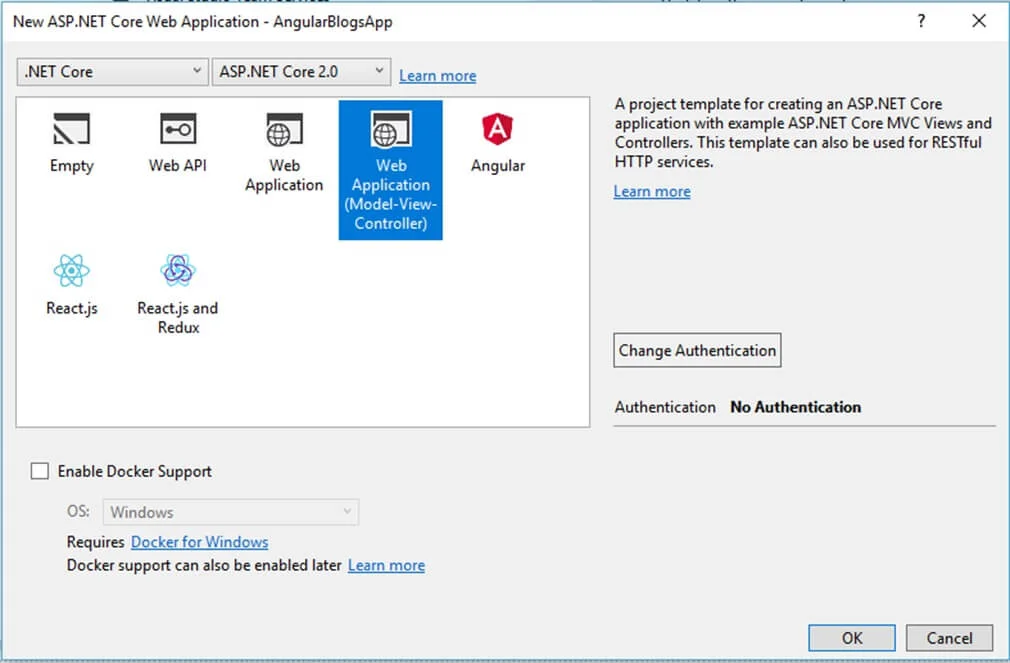
Figure-1: .Net Core 2.0 Templates
-
Note: .Net Core 2.0 comes with an Angular Template. This template uses Webpack and if you want to make any changes, you need to know Webpack. Using the Angular CLI instead, you can use the CLI commands to cut down dev time, modify the cli config for building and packaging, and behind the scenes the cli uses Webpack.
-
-
Once the solution is created, remove everything under the wwwroot as these default files are not needed.
-
Optional: Once the solution is created, remove bower.json and bundleconfig.json
-
In order to bring in the Angular template, open a command prompt and navigate to the solution directory.
-
Using the command prompt, run ng new AngularBlogsApp as seen in Figure-2. Running this command will bring in the appropriate template files. NOTE: Closing the solution file might be needed in order to fully run the cli "new" command.

Figure-2: Angular CLI creating a new project
-
Still using the command prompt, navigate down one directory into the application folder. Run npm install to bring in the modules.
-
In order to configure the location of where the Angular build files are put, I need to change the outDir property of the .angular-cli.json to be wwwroot.
-
Note: .Net Core serves static files out of the wwwroot directory
-
-
In the open command prompt, run ng build which will build your Angular application and put the distribution files into the wwwroot
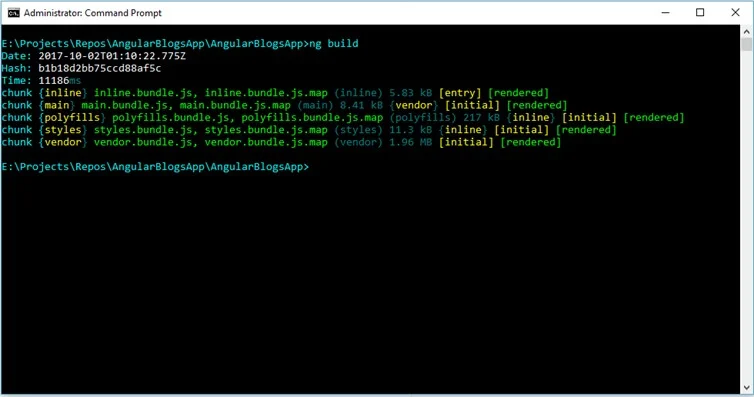
Figure-3: Angular CLI build command
-
In order to get the Angular application to run with the .Net Core template, the _Layout.cshtml and Index.cshtml files need to be modified
-
In the _Layout.cshtml, the < base href> is a key element included at the top of the head. This element tells the router how to compose URLs for navigation. In my application, the src/app folder will be at the root level of the application, so I am using < base href="/">
-
I will also go through the _Layout.cshtml file and remove/cleanup any other references and html that is not needed
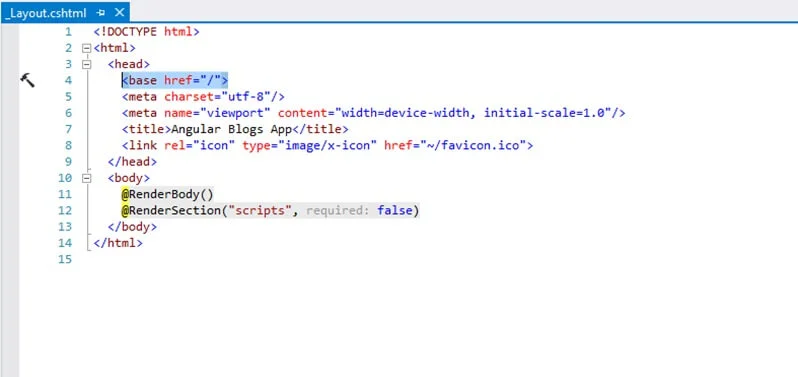
Figure-4: _Layout.cshtml file changes
-
In the Index.cshtml file, the Angular static script files are referenced as well as the root selector tag, as defined in app.component (described below). This tag is the entry into this particular spa application. Here my tag is < app-root>
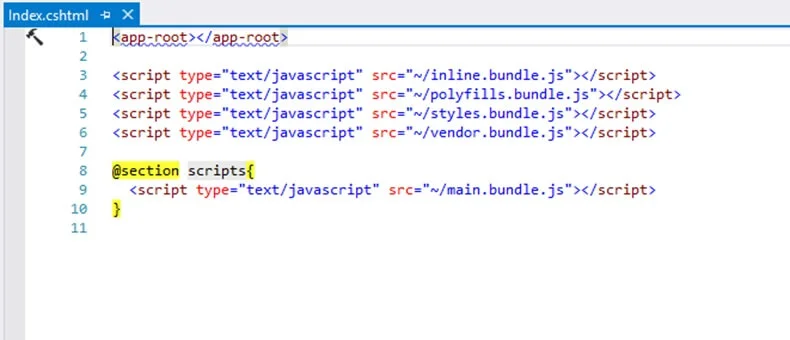
Figure-5: Index.cshtml file changes
-
- Run the application
New File Types To Know
The package.json file is the npm configuration file. This file holds references to all the dependencies needed by the UI to not only run, but also for development.
The tsconfig.json file is the TypeScript configuration file for when a .ts file is compiled into a .js file.
The src folder, shown in Figure-6, is where your Angular application will live, typically under its own app folder. Included under the src folder are files that define your entry points to be used by the Angular CLI. The ployfills.ts is mostly import statements and the name of the file makes it pretty self-explanatory as to what is in it.
The main.ts bootstraps the Angular application module to be able to be run in a browser.
The app.module.ts utilizes the @NgModule decorator to help describe how the application pieces work together. Imports, Declarations, Providers. Every Angular Application will have one or more Angular Modules. The root module, such as this module, will be used to bootstrap the application. In this particular module, there is also a bootstrap meta information property informing Angular which component is the root application component.
The app.compoennt.ts is the root component used in this application. We will cover Angular components in more detail in the next blog. For now, the basics you need to know are that an Angular component is defined by the @Component decorator and meta information. In this simple component, I have the html to display and the selector, which is used to identify when this component is to be used.
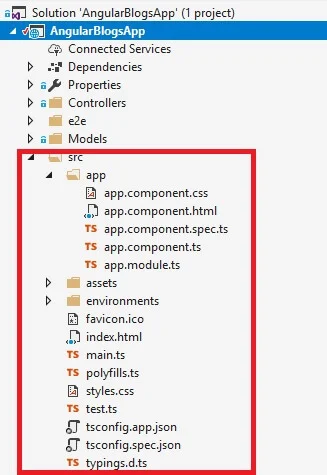
Figure-6: The src folder holding your application files
We've reviewed the basics of starting your journey of migrating from AngularJS to Angular. In the next blog, we will dig a little deeper and discuss Controllers to Components and HTML Syntax
Let us know: What challenges are you encountering as you make the change from AngularJS to Angular?
Cazton is composed of technical professionals with expertise gained all over the world and in all fields of the tech industry and we put this expertise to work for you. We serve all industries, including banking, finance, legal services, life sciences & healthcare, technology, media, and the public sector. Check out some of our services:
- Artificial Intelligence
- Big Data
- Web Development
- Mobile Development
- Desktop Development
- API Development
- Database Development
- Cloud
- DevOps
- Enterprise Search
- Blockchain
- Enterprise Architecture
Cazton has expanded into a global company, servicing clients not only across the United States, but in Oslo, Norway; Stockholm, Sweden; London, England; Berlin, Germany; Frankfurt, Germany; Paris, France; Amsterdam, Netherlands; Brussels, Belgium; Rome, Italy; Sydney, Melbourne, Australia; Quebec City, Toronto Vancouver, Montreal, Ottawa, Calgary, Edmonton, Victoria, and Winnipeg as well. In the United States, we provide our consulting and training services across various cities like Austin, Dallas, Houston, New York, New Jersey, Irvine, Los Angeles, Denver, Boulder, Charlotte, Atlanta, Orlando, Miami, San Antonio, San Diego, San Francisco, San Jose, Stamford and others. Contact us today to learn more about what our experts can do for you.


