Making the Move from AngularJS to Angular - Part Three: Dependency Injection and Routing
To alleviate some of the same trials and tribulations we encountered in making the move from AngularJS to Angular, we thought we'd share some of the common areas most developers will encounter in this blog series.
- Part One: Understanding the Basics
- Part Two: Controllers to Components and HTML Syntax
- Part Three: Services, Observables, and Routing
- Part Four: Commonly used controls and other items worth sharing (Coming Soon)
- Part Five: Enterprise Case Study (Coming Soon)
In the previous blog, we demonstrated how to generate new components, different ways to bind data from component class to view and vice versa and even discussed change detection. Now, we'll discuss some of the different ways to handle dependency injection along with using routes to navigate throughout an application before going into forms and how to get/post data to an API service.
Dependency Injection
From the outside, Angular's Dependency Injection is a nice "magical" act between the @Injectable decorator, Tokens, and Providers.
- Tokens: are keys used to reference a Provider. They can be strings, classes, objects, etc.
- Providers: are ways for a user to tell Angular which concrete class, value, object to use for a Token.
- @Injectable: is a decorator to identify dependencies. This decorator helps give Angular the information it needs to tell the injectors what token to lookup.
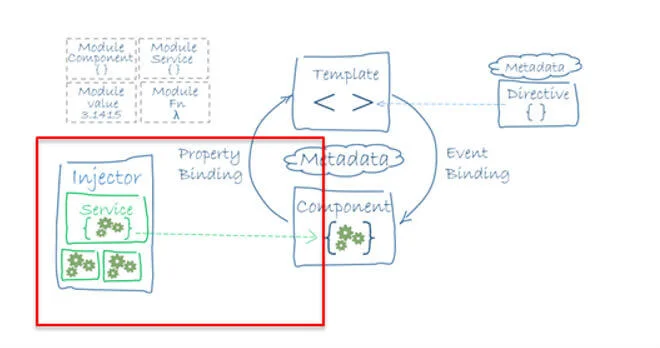
Figure-1: Angular Architecture provided by Angular Documentation
@Inject()
@Inject() is a decorator used to manually identity dependencies and the token an injector should use for this dependency. If everything that is injected used this syntax, the code could get really messy. This will become a little clearer when Injection Tokens are discussed.
@Injectable()
@Injectable() is a decorator attached to a class. This decorator informs Angular that this class has dependencies that need to be injected. Angular identifies the tokens by the type specified.
A common misconception is that this decorator is needed for this class to be injected somewhere else. The decorator is not required if a class has no dependencies or if another decorator is present. A best practice though is to use @Injectable(). The reason the decorator is not necessarily needed, in these cases, is that the class is still being declared as a provider, which allows it to be injected. The decorator is simply there to help Angular read the metadata about the dependencies needed.
Figure-2 shows some of the different implementations of a valid service, which could be injected into the following component constructor:
export class AppComponent { constructor(private appService: AppService) { console.log('appService:', this.appService.getValue()); } } 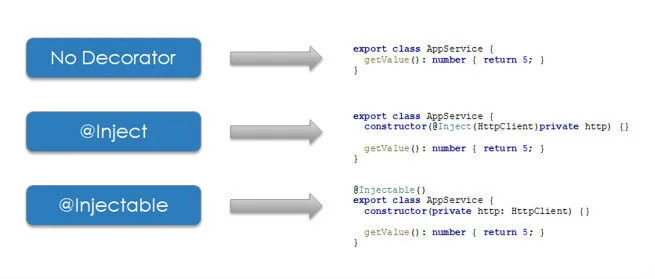
Figure-2: Valid Implementation of AppService
Providers
A class with Injectable by itself will not be used in dependency injection. The Angular injector needs to know the concrete classes to be used and that's where providers come in. They register the concrete classes, values, and objects with an injector. There are many different ways to register providers as well as at different levels of the component tree.
Common/Default/Basic:
You will see it declared in @NgModules or @Component as the following:
providers: [AppService]
The code above is shorthand for the snippet below and it allows shorthand because the provider and class are the same name. It can be read as Inject AppService using the class AppService. The provide property is the token that registers this key to a class, object, or value. The injector will look up this key when trying to find a dependency to inject. The useClass property is the concrete class, object, value, etc. to be injected.
providers: [{provide: AppService, useClass: AppService}]Alternate Class Providers:
Using a different class for the provider is registering using an alternate class provider.
providers: [{provide: AppService, useClass: NewAppService}]Notice in the code snippet above the alternate class being used. It is not the same name as the provide and it is not the same class as AppService, but depending on the injector level, the AppService provider could inject an AppService or this NewAppService. The dependency injection hierarchy will be discussed later.
Class Provider with Dependencies:
Sometimes classes have dependencies of their own. These dependencies need to be registered at the same level or higher up the component tree (i.e. the current component, a parent component, or a module).
Figure-3 shows this relationship with parent and child components. The left side shows where providers can be registered when a child component class has a dependency injection. The right side shows where providers can be registered when the parent component class has a dependency injection.

Figure-3: Dependency relationship with parent and child components.
Aliased Class Provider:
An aliased class provider uses a single class for two separate providers. This is accomplished by the aliased provider using useExisting rather than useClass. If useClass is used in both provider instances, two instances of this provider class will exist.
providers: [NewAppService, {provide: AppService, useExisting: NewAppService}]An example of when this type of provider registration would be used is adding in a new service, but being unable to remove the legacy code.
Value Provider:
Instead of creating an object from a class, a value provider uses an existing object, primitive type, or function.
It can use an existing object, primitive type, or function instead of creating an object from a class.
When the token is not a class, we will use an Injection Token. The code snippets below show the UtilityService as the token. Instead of then creating a class from UtilityService, the ValueService object will be used instead. Internally ValueService looks like UtilityService, so they can be used interchangeably.
  export class UtilityService { getValue() {} }
 export let ValueService = { getValue: () => {} }
 providers: [{provide: UtilityService, useValue: ValueService}]
Injection Tokens:
Injection tokens allow non-class dependencies to register with an injector as a token. An injection token allows you to define a variable as a token for the injector, even though it is not a class. This new token can then be associated with a value provider.
In order to define an injection token:
- A variable that is to become the token is declared
- Declare a new generic InjectionToken and specify the type of the value that will be used
- The description in the InjectionToken constructor has no relevance and is only an aid in development
export let RANDOM_VALUE = new InjectionToken('can.be.anything'); - The InjectionToken is then able to be used to register with a provider
providers: [{provide: RANDOM_VALUE, useValue: 100}] - Use @Inject to specify the token to use for injection
export class AppComponent { constructor(@Inject(RANDOM_VALUE)private randomValue: number) {} }
Dependency Injection Hierarchy:
There is a hierarchy with how providers are registered in Angular:
Module:
At the module level (regardless if it is an app module, feature module, shared module, etc.), all providers specified within a module will be registered with the app level injector during initialization.
Component:
At the component level, a provider is registered in a component's config object. The provider registered within a component is available not only for that component, but all its decedents as well. The generated dependency object created by this provider has a lifespan the same as the component the provider is registered on.
Lazy Loading:
One caveat to the statement earlier about all providers in modules being registered with the app level injector, is modules that are lazy loaded. Lazy loading happens when a module gets loaded and its associated route is hit. Even though that provider is in the module when this module finally registers, it is not part of the app level injector from application load. It is in its own lazy loaded injector. Therefore, if a provider was registered in the app module and in a lazy loaded module, there will be two instances.
Injector Bubbling
When a component needs a dependency, Angular will check that component's injector. If not satisfied there, it will work its way up the app component tree until it gets to the root. If nothing is found, an error will be thrown. The root, a component parent, and a component itself could all register the same provider. In this case, each of those injectors would have its own instance. Also, knowing that an instance lasts only as long as the injector it is associated with, we understand that everything at the app level is a singleton.
But what about when multiple modules or components at the same level register the same provider? Will multiple instances be created? The answer is no. Angular has multiple creation protection. For example, if the same provider is registered in two modules (not lazy loaded) and imported into the AppModule, Angular will use multiple creation protection. The injector will check and notice if an injector token key is already present at that level and not do anything if the token already exists.
Routing
Most web applications will need some aspect of Angular Routing. In order to fully implement routing in an Angular application, three pieces are required: the base href, the router service, and the configured routes.
base href
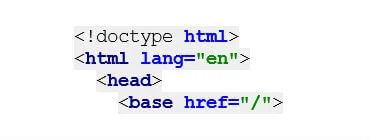
The base href tag needs to be added as the first tag under the head tag. This tag tells the router how to create urls based upon a relative path with the root of the Angular application. In most cases, the app folder is the root.
Router Service
The router service is a singleton service, which is brought in by importing the RouterModule. The significance of this service is that when the url changes, it will look for defined routes and then display the corresponding component.
Route Configurations
Understanding how routes are configured and how the router service determines which route to use is important to understand. Before diving too much into how to generate a route configuration, know that the route order makes a difference. Routes need to be configured top down, from specific to general.
A route configuration consists of three parts:
- Route Definitions
- Configuring the Router Service
- Importing the Router Service into the AppModule
Route Definitions
A route definition defines a URL path to a component. A basic route definition consists of a path (relative or absolute) with no leading slashes and the component that will handle this route.
 http://localhost:4200/Widget

const routes: Routes = [ { path: 'Widget', component: WidgetComponent } ];
This same route definition will also handle any route with that path and query parameters:
http://localhost:4200/Widget?foo=1&bar=2
On the other hand, route parameters are able to be used by inserting route parameter tokens into the path.
 http://localhost:4200/Widget/1

const routes: Routes = [ { path: 'Widget/:id', component: WidgetComponent } ];
Since order does matter, the route path with route parameters needs to be defined before the same route path without route parameters.
const routes: Routes = [ { path: 'Widget/:id', component: WidgetComponent }, { path: 'Widget', component: WidgetComponent } ]; A route definition is able to pass static data to its component by using the data property. If dynamic data is needed in a component, the resolve guard is used.
const routes: Routes = [ { path: 'Widget', component: WidgetComponent, data: { title: 'Widget List' } } ]; When an application first launches, no path is defined. To set a no path (aka an empty path), only a forward slash is used.
 http://localhost:4200

const routes: Routes = [ { path: '/', component: WidgetComponent } ];
Instead of an empty path (or any path for that matter) defining a specific component, the path can redirect to any other path. To create a redirect route definition, the component property is replaced with the redirectTo and pathMatch properties. redirectTo needs to be the path to which the URL is set. pathMatch is how to determine if the incoming URL should be redirected. pathMatch can have two possible values: full or prefix. full is a match against the remaining URL, whereas prefix asks if the remaining URL starts with that path. As a note, from the top of the routing level, the remaining URL is the entire URL, but as a child route, it is only at that level.
 http://localhost:4200  ->  http://localhost:4200/Widget

const routes: Routes = [ { path: '/', redirectTo: 'Widget', pathMatch: 'full' } ];
All routes need to be handled; even routes that do not have route definitions. The route definition that can handle any route uses the wildcard path. This path can be used to protect and/or provide information for route paths that do not exist.
 http://localhost:4200/NotValidRoute

const routes: Routes = [ { path: '**', component: NotValidRouteComponent } ];
Configuring the Router Service
In order to configure the router service, the RouterModule.forRoot method simply takes in the route definitions array. It is as simple as that. During debugging though, all router events can be enabled to be displayed in the console by setting an optional options object to enableTracing.
Import the Router Service into the AppModule
This import and the "Configuration of the Router Service" can all be done in a single line.
const routes: Routes = [ { path: 'Widget', component: WidgetComponent } ]; @NgModule({ imports: [RouterModule.forRoot(routes, { enableTracing: true })], exports: [RouterModule] }) Router Directives
A few built in Angular directives exist to help routing and redirection from an Angular template.
Router Outlet
The router-outlet directive marks where the component view should be displayed. An application can have more than one router-outlet (i.e. child routes).
<router-outlet></router-outlet>
RouterLink
The routerLink is a property bound directive to a defined route path.
<a routerLink="/Widget">Widget Route</a>
Child routes and route parameters can be set through an array value.
<a [routerLink]="['/Widget', 'Detail']">Child Route Parameter</a>
Query parameters get set by property binding an object of key value pairs to a queryParams property bound directive.
<a routerLink="/Widget" [queryParams]="{foo: 1}">Query Parameter</a>The routerLink value can be either an absolute path or a relative path. An absolute path will start with a "/" to specify it starts at the root. If it doesn't have a "/", it would be relative to the current URL at the level of the component template.
RouterLinkActive
On the same tag as the routerLink, is an optional property bound directive: routerLinkActive. As the name implies, when the link is active, the space delimited classes bound to this property will be set and will be removed when link is inactive.
<a routerLink="/Widget" routerLinkActive="selected">Widget Route</a>
RouterLinkActiveOptions
Also on the same tag as the routerLink, is another optional property bound directive: routerLinkActiveOptions. This directive is used to set the routerLinkActive classes only when the route path is exactly what is set with the routerLink.
<a routerLink="/Widget" routerLinkActive="selected" [routerLinkActiveOptions]="{exact: true}">Another Route</a>Child Routes
Child routes are defined by specifying the children property on the route definition. Also, if the children component view is adding its view to the existing views, the parent component view will want to add a router-outlet for the children.
const routes: Routes = [ { path: 'Widgets', component: WidgetsComponent, children: [ { path: ':id', component: WidgetDetailsComponent }, { path: '', component: WidgetDetailsComponent } ] } ]; Multiple paths can be defined instead of creating a children array of route definitions. What are the real benefits of defining child routes? The answer to that question is Relative Routing and Nested Router Outlets.
Relative Routing
By using child routes, relative routing is able to be used instead of full absolute paths. Therefore "./" or "" (i.e. nothing) can be used to stay at the same level. Similarly, "../" can be used to go up a level. Examples of this usage can be seen below inside the template view as well as router inside the component.
Within a routerLink
<a routerLink="./Widget">Widget</a>
Within a component
this.router.navigate(['./reports'], { relativeTo: this.activatedRoute });Nested Router Outlets
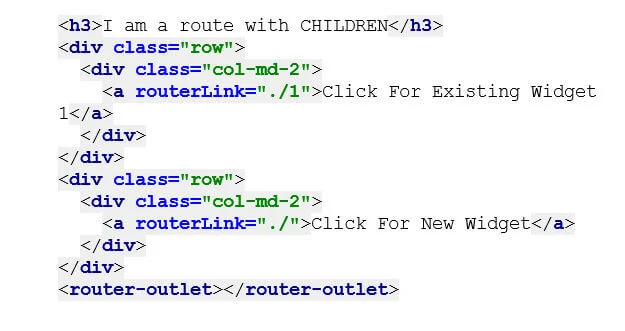
The parent of a child route can specify a nested router-outlet tag where the child route component view will be displayed. In the following example the two links, "Click For Existing Widget 1" and "Click For New Widget," will still be shown regardless of which link is clicked. This is because of the children definition and router-outlet defined in this template. The router-outlet here will also be where the appropriate child component view is displayed.
Component Reuse
Nested router-outlets also allow for component reuse. If a change in the URL causes the same component to be used, the component will not regenerate. Instead it will just be used as it already is. Figure-4 is an example of component reuse.
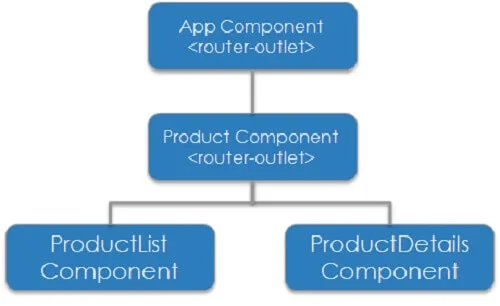
Figure-4: Component Reuse
Example Overview
- AppComponent is bootstrapped to the AppModule so loads upon application initialization. It has the root router-outlet.
- ProductComponent is the default route. It has its own router-outlet and two child routes.
{ path: 'Product', component: ProductComponent, children: [ { path: 'List', component: ProductListComponent }, { path: 'Details/:id', component: ProductDetailsComponent } ] } Example Navigation Flow
- Navigate to http://localhost:4200/Product/Details/1.
- Application is first hit so, AppComponent, ProductComponent, and ProductDetailsComponent are all created and initialized.
- Navigate to http://localhost:4200/Product/Details/2.
- The URL has not changed. The number 2 is a route parameter but still conforms to the ProductDetailsComponent path. All three components are reused.
- Navigate to http://localhost:4200/Product/List.
- The URL has ONLY changed at the lowest level. AppComponent and ProductComponent are reused. ProductDetailsComponent is destroyed and ProductListComponent is created and initialized.
Activated Route
The activated route is the current route path and parameters as an injected service. It provides the ability to get route parameters and query parameters through paramMap and queryParamMap. Both paramMap and queryParamMap return observables. This fact is important to know because with Child Routes and the ability for component reuse, a component will not be destroyed nor regenerated. This observable allows the new parameters and queryParmeters to be retrieved.
constructor(private route: ActivatedRoute) { var observableMapping: Observable = this.route.paramMap; this.route.paramMap.subscribe((paramMap: ParamMap) => this.paramId = +paramMap.get('id')); this.route.queryParamMap.subscribe((paramMap: ParamMap) => this.queryParamValue = paramMap.get('foo')); } On the other hand, using snapshot allows the paramMap and queryParamMap to have a non-observable object. The snapshot property returns an ActivatedRouteSnapshot.
constructor(private route: ActivatedRoute) { var mapping:ParamMap = this.route.snapshot.paramMap; this.paramId = +this.route.snapshot.paramMap.get('id'); this.queryParamValue = this.route.snapshot.queryParamMap.get('foo'); } For route definitions that pass static data into the data property, that data object can be accessed via the activated route as well.
constructor(private route: ActivatedRoute) { this.dataProperty = this.route.snapshot.data; } Guards
Route guards provide the ability to "guard" against navigating to a page or away from a page based upon some criteria. They can also provide some dynamic data to be loaded prior to the component being loaded. Some of the times to use guards include:
- Authenticate or verify authentication
- Handle pending changes before leaving a page
- Retrieve some data before displaying the component
Example of a guard:
@Injectable() export class ExampleGuard implements CanActivate { constructor(private router: Router) {} canActivate(): boolean { // Uncomment this line to test being able to access a route // return true; // Uncomment these two lines to test NOT being able to access a route this.router.navigate(['/Routing', 'NotAuthorized']); return false; } } What are the guards?
- CanActivate to mediate navigation to a route.
- CanActivateChild to mediate navigation to a child route.
- CanDeactivate to mediate navigation away from the current route.
- Resolve to perform route data retrieval before route activation.
- CanLoad to mediate navigation to a feature module loaded asynchronously.
Guard Hierarchy
Multiple guards are allowed for each route path at each level of the routing hierarchy:
- CanActivateChild and CanDeactivate: Checked first starting at the bottom and going up.
- CanActivate: Checked second starting at the top and going all the way down.
- CanLoad: Last and is only checked if a module is loaded asynchronously.
If any of these guards return false, any other checks will be cancelled and the route change is cancelled.
Routing Modules
Even in a simple application, it is a best practice to move the routing information into a module called a Routing Module. This routing module is not only for the root/app module, but for every feature module as well. By moving the routing information into its own module, the concerns between routing and other application functionality are separated. This routing module also provides a good location for routing service providers such as guards and resolvers.
In order to implement a routing module, there are a few simple steps:
- Import Routes and RouterModule
- Define the routes for the specific feature
- Export the class as the root/feature module name but as
RoutingModule - Most importantly, inside the routing module Angular configuration object, declare the RouterModule as an import and when declaring the router service, use .forRoot (if root level) or .forChild (if feature level) with the route definitions
import { Routes, RouterModule } from '@angular/router'; const routes: Routes = [ { path: '', redirectTo: 'Widgets', pathMatch: 'full'} ]; @NgModule({ imports: [RouterModule.forRoot(routes)], exports: [RouterModule] }) export class AppRoutingModule { } For more information about any of these topics, please reference the Angular Documentation.
We'll cover more on this in the next blog of this series where we'll discuss commonly used controls and other items worth sharing
Tell us: What do you find most challenging as you make the change from AngularJS to Angular? What obstacles are you encountering?
Cazton is composed of technical professionals with expertise gained all over the world and in all fields of the tech industry and we put this expertise to work for you. We serve all industries, including banking, finance, legal services, life sciences & healthcare, technology, media, and the public sector. Check out some of our services:
- Artificial Intelligence
- Big Data
- Web Development
- Mobile Development
- Desktop Development
- API Development
- Database Development
- Cloud
- DevOps
- Enterprise Search
- Blockchain
- Enterprise Architecture
Cazton has expanded into a global company, servicing clients not only across the United States, but in Oslo, Norway; Stockholm, Sweden; London, England; Berlin, Germany; Frankfurt, Germany; Paris, France; Amsterdam, Netherlands; Brussels, Belgium; Rome, Italy; Sydney, Melbourne, Australia; Quebec City, Toronto Vancouver, Montreal, Ottawa, Calgary, Edmonton, Victoria, and Winnipeg as well. In the United States, we provide our consulting and training services across various cities like Austin, Dallas, Houston, New York, New Jersey, Irvine, Los Angeles, Denver, Boulder, Charlotte, Atlanta, Orlando, Miami, San Antonio, San Diego, San Francisco, San Jose, Stamford and others. Contact us today to learn more about what our experts can do for you.


