Introduction to Cosmos DB
Cosmos DB is a NoSql database that provides strong consistency. It's schema free, supports sql-like querying, even has stored procedures, triggers and UDFs (User Defined Functions) written in Javascript. It's really Microsoft's answer to MongoDb, Cassandra, Couchbase and others. "Cosmos DB guarantees less than 10 millisecond latencies on reads and less than 15 millisecond latencies on writes for at least 99% of requests." With that kind of performance guarantees, Cosmos DB is set to take over the world.
Microsoft also supports a .NET, Node.js, Java and a python SDK for Cosmos DB. It runs in Azure and is fully managed. It automatically replicates all the data to any number of regions worldwide. It provides a wide variety of consistency levels.
- Strong Consistency: This is an RDBMS like consistency. With every request, the client is always guaranteed to read the latest acknowledge write. However, this is the slow and in order to use this the Cosmos DB account cannot be associated with more than one region.
- Bounded Staleness: This level guarantees that the reads may lag behind by at most x versions of the document or a certain time interval by the client. For example, if the client sets x=2, the user will be guaranteed to get a document no later than the last two versions. It is the same with time. If the time is set to five seconds, every five seconds the resource will be guaranteed to have been written to all replicas to make sure that subsequent requests can see the latest version.
- Session: This is the most popular of all, and as the name suggests, is scoped to a client session. Imagine someone added a comment on a product on an eCommerce website. The user who commented should be able to see it; however, it will take some time before other users on the website can see it too.
- Eventual: As the name suggests, the replicas will eventually converge in absence of any additional writes. This happens to be the one with the weakest read consistency, but the fastest of all options.
- Consistent Prefix: By selecting this option, you ensure that sequence of writes is always reflected during subsequent reads.
Architecture:
The architecture is very simplistic. The Cosmos DB account has multiple databases. The database can be reached via the Uri: [AccountUri]/dbs/{id} where AccountUri is of the following pattern. "https://[account].documents.azure.net". The database has:
- Collections: Collections can be reached with the Uri [AccountUri]/dbs/{id}/colls/{id}. A Collection may have one or more of the following.
- Documents: can be reached with the Uri [AccountUri]/dbs/{id}/colls/{id}/docs/{id}
- Attachments: can be reached with the Uri [AccountUri]/dbs/{id}/colls/{id}/docs/{id}/attachments/{id}
- Stored Procedures: can be reached with the Uri [AccountUri]/dbs/{id}/colls/{id}/sprocs/{id}
- Triggers: can be reached with the Uri [AccountUri]/dbs/{id}/colls/{id}/triggers/{id}
- User Defined Functions: can be reached with the Uri [AccountUri]/dbs/{id}/colls/{id}/functions/{id}
- Documents: can be reached with the Uri [AccountUri]/dbs/{id}/colls/{id}/docs/{id}
- Users: Users can be reached with the Uri [AccountUri]/dbs/{id}/users/{id}.
- Users have permissions that can be reached with the Uri [AccountUri]/dbs/{id}/users/{id}/permissions/{id}
The unit of record is a Document and a collection is just as the name sounds, a collection of documents. Since documents are flat, it's better to think of them as flat object and not like rows in a table. Coming from the Sql world, there is a tendency to think of collection as table and documents like rows. However, that analogy has more problems than we might fully recognize, especially when it comes to designing the architecture and later implementing it.
Setting Up Cosmos DB in Azure:
In order to provision a Cosmos DB account, database and collection, please follow the tutorial below.
- Go to https://portal.azure.com
- Go to New -> Search the marketplace.
- Type Cosmos DB and it shows up as NoSQL (DocumentDB) -> Create.
- Select Pin to dashboard so you can access it easily.
- Add ID: cazton (keep in mind this URL has to be unique)
ResourceGroup: CaztonResourceGroup (See Figure 1)
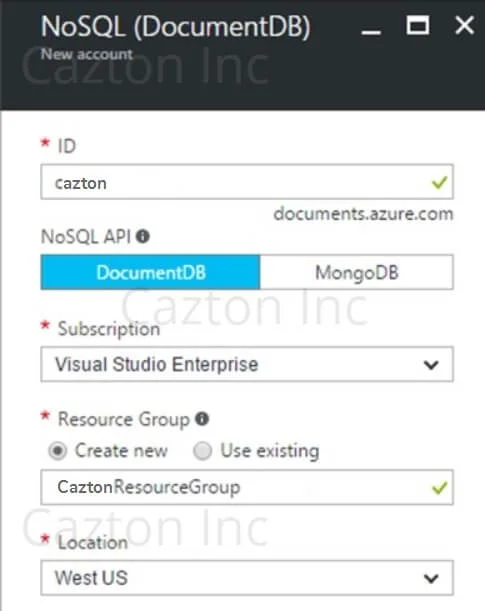
Figure 1: Creating a New Cosmos DB Account
Once that is done click Overview (Figure 2) and then click Add Collection.
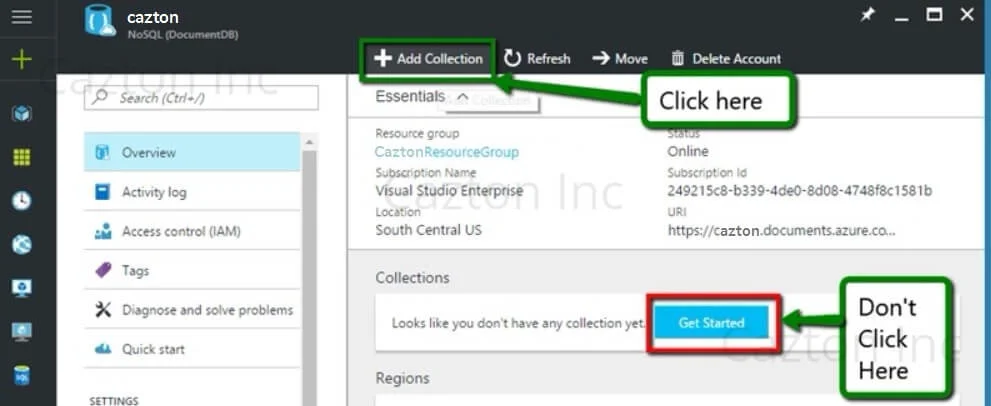
Figure 2: Cosmos DB Account
Add these values:
- Collection Id: Product
- Database: MasterDb
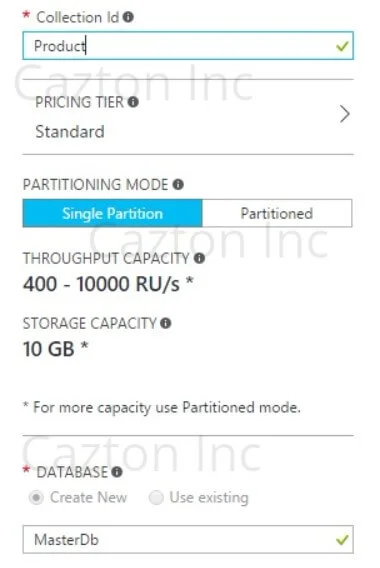
Figure 3: Create Collection Form
If you click Browse you should see that both the database and the collection has been created.
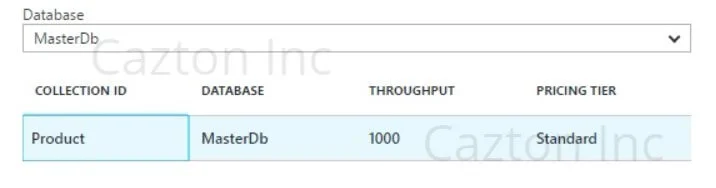
Figure 4: Browse: Cosmos DB Database and Collection
In order to connect, you will need the URI and the keys. For now, feel free to grab the URI and Primary Key. However, in an actual production environment you are better off using Secondary Keys and even Resource Tokens in order to control access to the database instance. Keys are in Figure 5.
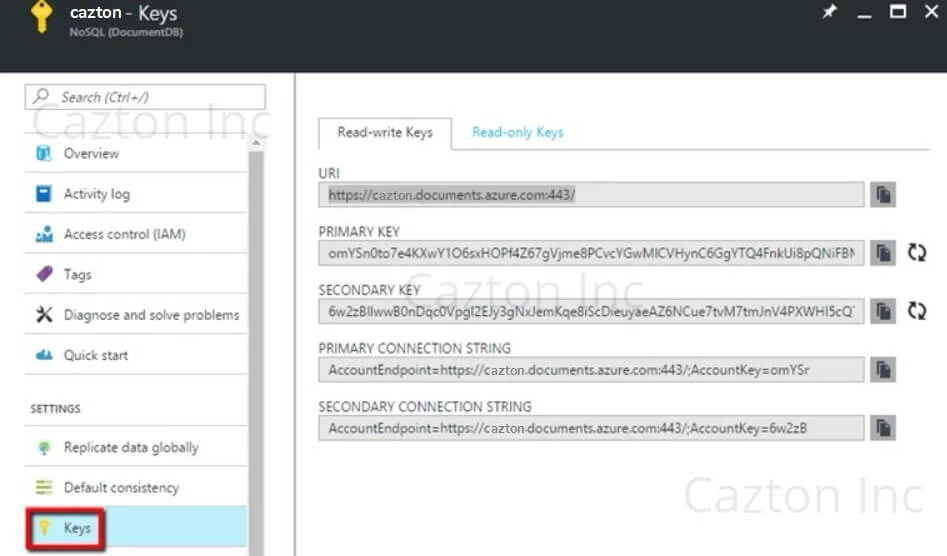
Figure 5: Uri, Primary and Secondary Keys
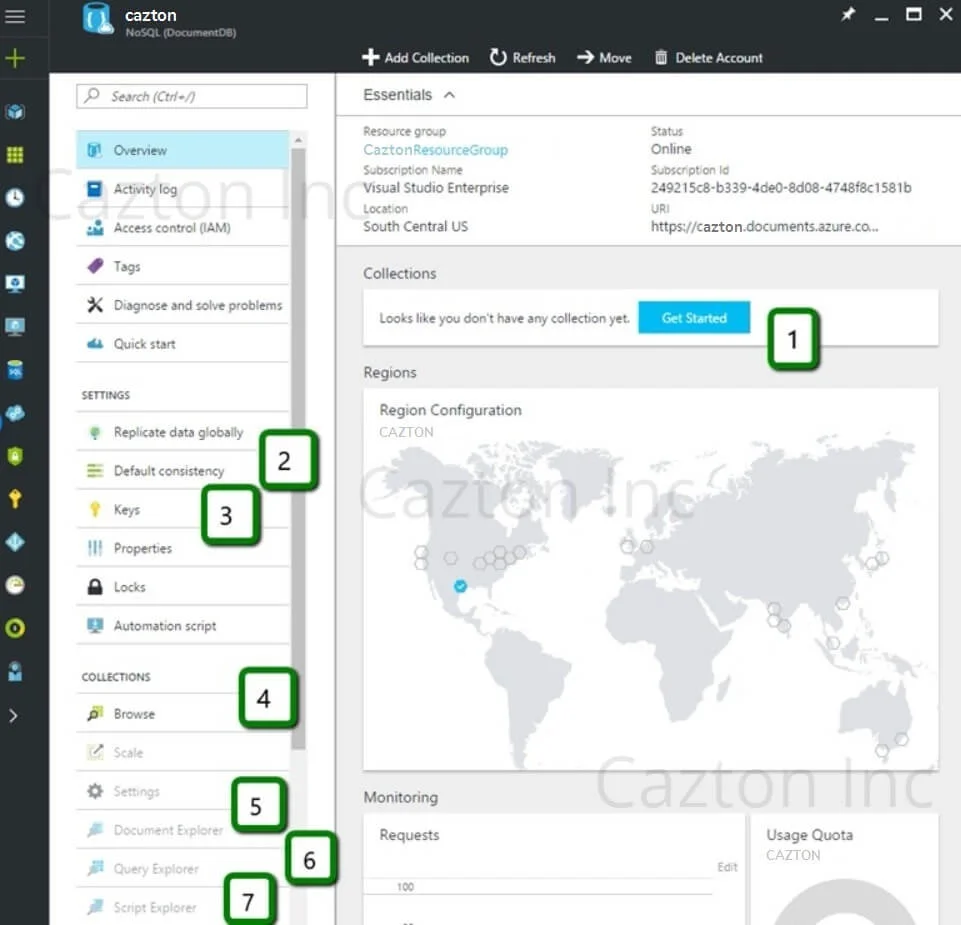
Figure 6: Cosmos DB Portal Features
Figure 6 Explained:
- No. 1: Generally speaking, you should avoid clicking on 'Get Started' as this will create a collection ToDoItems, which works with sample code. However, if you want your own collection, ignore this.
- No. 2: Default Consistency: When you click on No 2, you will be able to set the default consistency for your account.
- No. 3: When you click No 3, it will take you to Figure 5 and you can copy the Uri and the keys to connect to the Cosmos DB instance.
- No. 4: Browse: When you click No. 3, Figure 4 will show the current databases and once you pick the database you need from the dropdown it will list the collections under it.
- No. 5: Document Explorer: This is where you can select a collection and explore the documents in entirety.
- No. 6: Query Explorer: This helps you to create SQL like queries on the data within Cosmos DB.
- No. 7: Script Explorer: Allows you to write Stored Procedures, UDFs and other Javascript scripts supported by Cosmos DB.
Cosmos DB Emulator
While developing on the Cosmos DB Azure instance, you must remember that you will be spending money for both dev and test. However, the good news is that the Emulator comes in handy. You can do most of the things in the emulator and it's free as it runs on your local environment. You do not need an Azure subscription to work on this locally. A few limitations of the emulator are:
- It supports a single account only (AuthKey and Uri is shared below).
- It's not scalable.
- It doesn't simulate any of the consistency levels.
- It doesn't support multi-region replication.
CRUD Using Web API and Cosmos DB
Now let's create a Web API that does CRUD (Create, Read, Update and Delete) operations on. I'm using .NET Framework 4.5.2.
Go to File -> New Project -> Web -> ASP.NET Web Application and Choose Web API template. We named our solution - CaztonDocDb.
-
1. First things first, we need to add the following code in the Web.Config. If you downloaded the emulator the endpoint and the authKey listed below are standard ones and the only way to connect to it for now. If you'd like to target the Azure instance, you can use the Uri and key in Figure.
Web.config file
<appSettings> <add key="endpoint" value="https://localhost:8081/" /> <add key="authKey" value="{add-your-auth-key}" /> <add key="database" value="MasterDb" /> <add key="collection" value="Product" /> </appSettings> -
2. Create class Product.cs and add some properties to it. Decorate it with JsonProperty as we will be using Newtonsoft.Json wherever needed and the data will be passed around as JSON.
Product.cs Code
using Newtonsoft.Json; namespace CaztonDocDb { public class Product { [JsonProperty(PropertyName = "id")] public string Id { get; set; } [JsonProperty(PropertyName = "name")] public string Name { get; set; } [JsonProperty(PropertyName = "model")] public string Model { get; set; } [JsonProperty(PropertyName = "price")] public float Price { get; set; } } } -
3. We need to install Nuget Package Microsoft.Azure.Cosmos DB. You can use the GUI by right clicking the References tab in your project and clicking Manage Nuget Packages.
-
4. Create a folder Repositories.
-
5. Add the following interface. IDocdbRepository.cs
IDocdbRepository.cs
using Microsoft.Azure.Documents; using System; using System.Collections.Generic; using System.Linq; using System.Linq.Expressions; using System.Text; using System.Threading.Tasks; namespace CaztonDocDb.Repositories { interface IDocdbRepository where T : class { Task GetAsync(string id); Task<IEnumerable<T>> GetManyAsync(Expression<...> predicate); Task CreateAsync(T product); Task UpdateAsync(string id, T product); Task DeleteAsync(string id); void Initialize(); } }All the methods are pretty standard for a repository and we kept it generic so we can use it for any entity whatsoever.
-
6. Add the following class. DocdbRepository.cs
-
7. Once you have the class implement the interface as described in the comments sections below.
using Microsoft.Azure.Documents; using Microsoft.Azure.Documents.Client; using Microsoft.Azure.Documents.Linq; using System; using System.Collections.Generic; using System.Configuration; using System.Linq; using System.Linq.Expressions; using System.Threading.Tasks; using System.Web; namespace CaztonDocDb.Repositories { public class DocdbRepository : IDocdbRepository where T : class { //Click IDocdbRepository and press (Ctrl + .). //This will implement the interface. Press (Ctrl + Shift + B) to compile } }Adding Logic to the DocDbRepository Class
First, we need to add the DatabaseId and CollectionId as shown below.
private static readonly string DatabaseId = ConfigurationManager.AppSettings["database"]; private static readonly string CollectionId = ConfigurationManager.AppSettings["collection"]; private static DocumentClient client; //Usually this needs to be handled by the IoC container. However, keeping things simple for now.
-
8. Now we want to make sure we can create a Database inside Cosmos DB. We will try to read and find out if a database exists. If a database doesn't exist at that particular Uri, we will create one. In order to do that we use the DatabaseId from Web.Config and create the Uri using this code.
UriFactory.CreateDatabaseUri(DatabaseId) private async Task CreateDatabaseIfNotExistsAsync() { try { await client.ReadDatabaseAsync(UriFactory.CreateDatabaseUri(DatabaseId)); } catch (DocumentClientException e) { if (e.StatusCode == System.Net.HttpStatusCode.NotFound) { await client.CreateDatabaseAsync(new Database { Id = DatabaseId }); } else { throw; } } } -
9. Similarly, we will create a private method to create a Collection if it doesn't exist.
private async Task CreateCollectionIfNotExistsAsync() { try { await client.ReadDocumentCollectionAsync(UriFactory.CreateDocumentCollectionUri(DatabaseId, CollectionId)); } catch (DocumentClientException e) { if (e.StatusCode == System.Net.HttpStatusCode.NotFound) { await client.CreateDocumentCollectionAsync( UriFactory.CreateDatabaseUri(DatabaseId), new DocumentCollection { Id = CollectionId }, new RequestOptions { OfferThroughput = 1000 }); } else { throw; } } } -
10. Once that is done we just create an Initialize method which will be called one time. Later, we will add it to Global.asax.cs.
public void Initialize() { client = new DocumentClient(new Uri(ConfigurationManager.AppSettings["endpoint"]), ConfigurationManager.AppSettings["authKey"], new ConnectionPolicy { EnableEndpointDiscovery = false }); CreateDatabaseIfNotExistsAsync().Wait(); CreateCollectionIfNotExistsAsync().Wait(); } -
11. Now you can call this code from Global.asax.cs. Of course, this code should ideally be added through your IoC container (for a real production environment). However, this is a simplified version.
var repository = new DocdbRepository(); repository.Initialize();
-
12. First thing we need to do is create a Product. So, we will implement a method CreateAsync inside the DocDbRepository class. The trick really is to understand that the document here is the product object and the Uri appended to it will just have the DatabaseId and CollectionId. Why do we not need the Document Id? Simply, because the document hasn't been created. Once we have the document, Cosmos DB will automatically assign an Id to it. Cosmos DB creates it's own 'Id' which is different than the ID created by the user or application. That 'Id' is unique and is only read only.
public async Task CreateAsync(T product) { return await client.CreateDocumentAsync(UriFactory.CreateDocumentCollectionUri(DatabaseId, CollectionId), product); } -
13. Now, we need to implement the GetAsync method and in this case, all we need to do is pass in an ID of type string. BTW, Cosmos DB requires the ID to be a string so it's a best practice to create the ID as a string rather than using ToString() on an int field.
The way the following code works is that it tries to read the Id. However, if the ID doesn't exist it throws an exception and if the HTTP Status Code is 404, that means the resource doesn't exist.
public async Task GetAsync(string id) { try { var uri = UriFactory.CreateDocumentUri(DatabaseId, CollectionId, id); Document document = await client.ReadDocumentAsync(uri); return (T)(dynamic)document; } catch (DocumentClientException e) { if (e.StatusCode == System.Net.HttpStatusCode.NotFound) { return null; } else { throw; } } } -
14. GetManyAsync uses an Expression that has a predicate. Predicate is really a condition that can be specified by the method that calls this function and in this an object that confers to interface IDocumentQuery is created, uses deferred execution using Linq. This executes inside the while loop in an async fashion and adds the list of results as a range to the results list.
public async Task<IEnumerable<T>> GetManyAsync(Expression<...> predicate) { var uri = UriFactory.CreateDocumentCollectionUri(DatabaseId, CollectionId); IDocumentQuery query = client.CreateDocumentQuery( uri, new FeedOptions { MaxItemCount = -1 }) .Where(predicate) .AsDocumentQuery(); List results = new List(); while (query.HasMoreResults) { results.AddRange(await query.ExecuteNextAsync()); } return results; } -
15. Update is very easy. We need to pass in the Id of the document we are updating and the updated product object. Delete is self-explanatory.
public async Task UpdateAsync(string id, T product) { return await client.ReplaceDocumentAsync(UriFactory.CreateDocumentUri(DatabaseId, CollectionId, id), product); } public async Task DeleteAsync(string id) { await client.DeleteDocumentAsync(UriFactory.CreateDocumentUri(DatabaseId, CollectionId, id)); } -
16. In order to call this repository, we will create a Web API controller. It will have a route prefix of Products. In the absence of dependency injection or an IoC container, we will use the less preferred option of instantiating the repository inside the controller.
We will have to create an HTTP Post method. We will need to specify from the body. This is required for model binding between the JSON array that we will send using Postman (It's a chrome utility used to make HTTP calls) and Web API. You can also use curl or fiddler instead of post man.
using CaztonDocDb.Repositories; using Microsoft.Azure.Documents; using System; using System.Collections.Generic; using System.Linq; using System.Net; using System.Net.Http; using System.Threading.Tasks; using System.Web.Http; namespace CaztonDocDb.Controllers { [RoutePrefix("Products")] public class ProductsController : ApiController { private DocdbRepository repository; public ProductsController() { repository = new DocdbRepository(); } [HttpPost] [Route("")] public async Task CreateAsync([FromBody]Product product) { var documentCreated= await repository.CreateAsync(product); return documentCreated; } } }Postman call
  Verb: HTTP POST
 Url: http://localhost:7345/products
 Headers: Content-type: application/json
 Body:
{ "id" : "123", "name" : "iPhone", "model" : "iPhone 7 Plus", "price" : "FREE" } -
17. Next, we'll call the GetAsync method. In this case the condition is simple. Since the ID is a string return, every single document that has an ID. This simply means return all records. (Note: You really don't want to use this in production).
[HttpGet] [Route("")] public async Task> GetAsync() { var products = await repository.GetManyAsync(x => x.Id != null); return products; }Postman call
 Verb: HTTP GET
 Url: http://localhost:7345/products
No body or header -
18. Rest is easy to follow and if you like to code the rest of the controller logic, the code is there for reference.
using CaztonDocDb.Repositories; using Microsoft.Azure.Documents; using System; using System.Collections.Generic; using System.Linq; using System.Net; using System.Net.Http; using System.Threading.Tasks; using System.Web.Http; namespace CaztonDocDb.Controllers { [RoutePrefix("Products")] public class ProductsController : ApiController { private DocdbRepository repository; public ProductsController() { repository = new DocdbRepository(); } [HttpPost] [Route("")] public async Task CreateAsync([FromBody]Product product) { var documentCreated= await repository.CreateAsync(product); return documentCreated; } [HttpGet] [Route("")] public async Task> GetAsync() { var products = await repository.GetManyAsync(x => x.Id != null); return products; } [HttpPut] [Route("")] public async Task EditAsync([FromBody]Product product) { var document = await repository.UpdateAsync(product.Id.ToString(), product); return document; } [HttpDelete] [Route("")] public async void DeleteAsync(string id) { await repository.DeleteAsync(id); } } }
This was a basic tutorial on Cosmos DB. It covered basic operations of create, read, update, and delete. The power of Cosmos DB has already been proven in the MSDN user data store. There is a lot you can do with this amazing database, fully managed by Microsoft and I hope you have a lot of fun working with it. I highly recommend checking out the official documentation on CosmosDB.com.
Cazton is composed of technical professionals with expertise gained all over the world and in all fields of the tech industry and we put this expertise to work for you. We serve all industries, including banking, finance, legal services, life sciences & healthcare, technology, media, and the public sector. Check out some of our services:
- Artificial Intelligence
- Big Data
- Web Development
- Mobile Development
- Desktop Development
- API Development
- Database Development
- Cloud
- DevOps
- Enterprise Search
- Blockchain
- Enterprise Architecture
Cazton has expanded into a global company, servicing clients not only across the United States, but in Oslo, Norway; Stockholm, Sweden; London, England; Berlin, Germany; Frankfurt, Germany; Paris, France; Amsterdam, Netherlands; Brussels, Belgium; Rome, Italy; Sydney, Melbourne, Australia; Quebec City, Toronto Vancouver, Montreal, Ottawa, Calgary, Edmonton, Victoria, and Winnipeg as well. In the United States, we provide our consulting and training services across various cities like Austin, Dallas, Houston, New York, New Jersey, Irvine, Los Angeles, Denver, Boulder, Charlotte, Atlanta, Orlando, Miami, San Antonio, San Diego, San Francisco, San Jose, Stamford and others. Contact us today to learn more about what our experts can do for you.